Introduction to Baked Chicken Parmesan
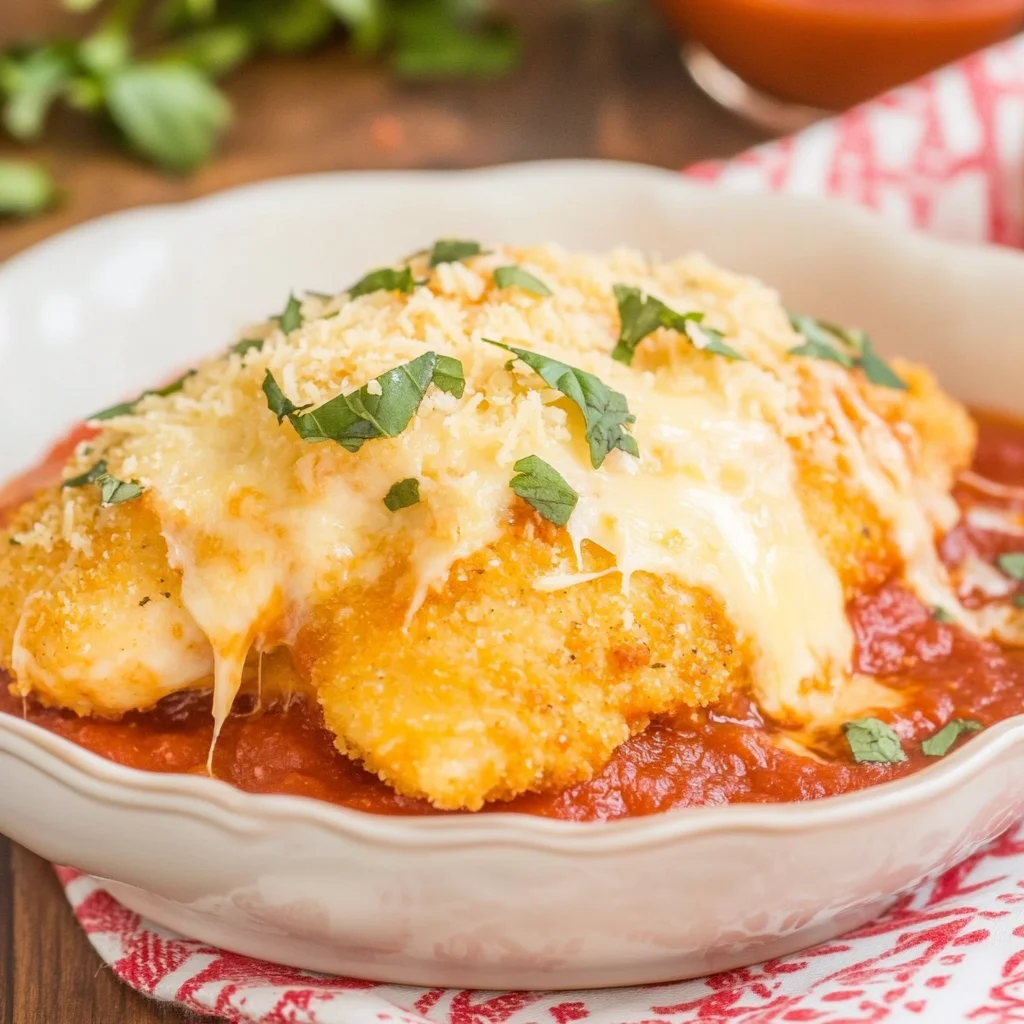
There’s something undeniably comforting about a plate of Baked Chicken Parmesan. It takes me back to family dinners where laughter filled the air, and the aroma of marinara sauce wafted through the kitchen. This dish is not just a meal; it’s a warm hug on a plate. Perfect for busy weeknights or impressing guests, Baked Chicken Parmesan combines crispy, breaded chicken with rich sauce and gooey cheese. It’s a crowd-pleaser that’s easy to whip up, making it an ideal choice for anyone looking to bring a little Italian flair to their table.
Why You’ll Love This Baked Chicken Parmesan
This Baked Chicken Parmesan is a game-changer for your dinner routine. It’s quick to prepare, taking just about 50 minutes from start to finish. The flavors are rich and satisfying, with that perfect balance of crispy chicken, savory marinara, and melted cheese. Plus, it’s a dish that pleases everyone at the table, making it a fantastic option for family meals or gatherings with friends. You’ll find yourself making it again and again!
Ingredients for Baked Chicken Parmesan
Gathering the right ingredients is the first step to creating a delicious Baked Chicken Parmesan. Here’s what you’ll need:
- Boneless, skinless chicken breasts: The star of the dish, providing a lean protein base that soaks up all the flavors.
- All-purpose flour: This helps create a crispy coating. You can substitute with gluten-free flour if needed.
- Large eggs: Beaten eggs act as the glue, helping the breadcrumbs stick to the chicken.
- Seasoned breadcrumbs: These add texture and flavor. You can use panko for extra crunch or make your own from stale bread.
- Grated Parmesan cheese: A must for that authentic Italian taste, adding a nutty flavor to the breading.
- Garlic powder: This brings a savory depth. Fresh minced garlic can be used for a bolder flavor.
- Dried oregano: A classic herb in Italian cooking, it adds a fragrant touch.
- Salt and black pepper: Essential for seasoning, enhancing all the other flavors in the dish.
- Marinara sauce: The rich, tangy sauce that ties everything together. Store-bought or homemade works great!
- Shredded mozzarella cheese: This melty goodness is what makes the dish irresistible. Feel free to mix in some provolone for a twist.
- Fresh basil leaves: Optional, but they add a pop of color and freshness when garnished on top.
For exact measurements, check the bottom of the article where you can find everything listed for easy printing!
How to Make Baked Chicken Parmesan
Creating Baked Chicken Parmesan is a straightforward process that yields delicious results. Follow these simple steps, and you’ll have a mouthwatering dish ready to impress!
Step 1: Preheat the Oven
Start by preheating your oven to 375°F (190°C). This ensures that your chicken cooks evenly and gets that perfect golden brown color. While the oven heats up, lightly grease a large baking dish to prevent sticking.
Step 2: Set Up the Breading Station
Next, it’s time to set up your breading station. In one dish, pour some all-purpose flour. In another, beat your eggs until smooth. In a third dish, mix together seasoned breadcrumbs, grated Parmesan cheese, garlic powder, dried oregano, salt, and black pepper. This setup makes the breading process quick and efficient.
Step 3: Bread the Chicken
Now, let’s get to the fun part! Take each chicken breast and dredge it in the flour, shaking off any excess. Then, dip it into the beaten eggs, allowing the egg to coat the chicken. Finally, coat the chicken in the breadcrumb mixture, pressing gently to ensure it sticks well. Repeat this for all the chicken breasts.
Step 4: Bake the Chicken
Arrange the breaded chicken breasts in your prepared baking dish. Make sure they’re spaced out for even cooking. Bake them in the preheated oven for about 25 minutes. You’re looking for a golden brown color and for the chicken to be cooked through.
Step 5: Add Marinara and Cheese
Once the chicken is baked, remove it from the oven. Spoon marinara sauce generously over each piece, letting it soak in a bit. Then, sprinkle shredded mozzarella cheese on top. This is where the magic happens, as the cheese melts into gooey perfection!
Step 6: Final Bake
Return the dish to the oven for an additional 10-15 minutes. Keep an eye on it until the cheese is melted and bubbly. The aroma will be irresistible, and your kitchen will feel like an Italian trattoria!
Step 7: Rest and Garnish
After baking, let the chicken rest for a few minutes. This helps the juices redistribute, keeping the chicken moist. Before serving, garnish with fresh basil leaves for a pop of color and flavor. Now, it’s time to dig in!
Tips for Success
- Use a meat mallet to pound the chicken breasts to an even thickness for uniform cooking.
- Let the breaded chicken sit for a few minutes before baking to help the coating adhere better.
- For extra flavor, marinate the chicken in Italian dressing for a couple of hours before breading.
- Experiment with different cheeses like provolone or fontina for a unique twist.
Equipment Needed
- Baking dish: A large, oven-safe dish works best. You can also use a sheet pan if you prefer.
- Three shallow dishes: For the breading station, any shallow bowls or plates will do.
- Meat mallet: Great for pounding chicken, but a rolling pin or heavy pan can work too.
- Whisk: For beating the eggs; a fork can also do the trick.
Variations
- Gluten-Free: Substitute all-purpose flour and breadcrumbs with gluten-free alternatives to enjoy this dish without the gluten.
- Spicy Kick: Add red pepper flakes to the breadcrumb mixture for a spicy twist that will elevate the flavor profile.
- Vegetarian Option: Replace chicken with eggplant or zucchini slices, breading and baking them the same way for a delicious meatless version.
- Cheesy Delight: Mix different cheeses like gouda or cheddar into the mozzarella for a richer, more complex flavor.
- Herb Infusion: Incorporate fresh herbs like thyme or rosemary into the breadcrumb mixture for an aromatic touch.
Serving Suggestions
- Spaghetti: Serve alongside a generous portion of spaghetti tossed in olive oil or marinara for a classic pairing.
- Green Salad: A fresh green salad with a light vinaigrette complements the richness of the chicken.
- Garlic Bread: Don’t forget the garlic bread! It’s perfect for soaking up any leftover sauce.
- Wine Pairing: A glass of Chianti or a crisp Pinot Grigio enhances the Italian flavors beautifully.
FAQs about Baked Chicken Parmesan
As you dive into making this delicious Baked Chicken Parmesan, you might have a few questions. Here are some common queries that can help you along the way:
Can I use chicken thighs instead of breasts?
Absolutely! Chicken thighs will add a bit more flavor and moisture. Just adjust the cooking time slightly, as they may take a bit longer to cook through.
How can I make this dish healthier?
To lighten it up, consider using whole wheat breadcrumbs and reducing the amount of cheese. You can also bake the chicken without frying it first for a lower-fat option.
Can I prepare Baked Chicken Parmesan in advance?
Yes! You can bread the chicken and store it in the fridge for a few hours before baking. Just add a few extra minutes to the cooking time if it’s cold from the fridge.
What can I serve with Baked Chicken Parmesan?
This dish pairs wonderfully with spaghetti, a fresh salad, or even roasted vegetables. Garlic bread is also a fantastic side to soak up that delicious marinara sauce!
Can I freeze leftovers?
Definitely! Baked Chicken Parmesan freezes well. Just make sure to store it in an airtight container. When you’re ready to enjoy it again, thaw it in the fridge and reheat in the oven.
Final Thoughts
Cooking Baked Chicken Parmesan is more than just preparing a meal; it’s about creating memories. The joy of watching your loved ones savor each bite, the laughter shared around the table, and the satisfaction of serving a dish that feels like a warm embrace are priceless. This recipe is a reminder that good food brings people together. Whether it’s a weeknight dinner or a special occasion, Baked Chicken Parmesan is sure to impress. So roll up your sleeves, gather your ingredients, and let the deliciousness unfold. You’ll find that this dish quickly becomes a cherished favorite in your home!