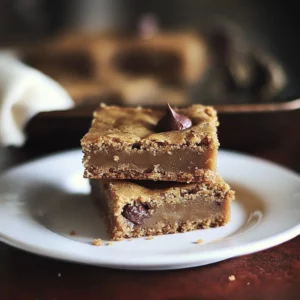
Introduction to Chocolate Blossom Cookies
There’s something magical about the aroma of freshly baked cookies wafting through the house. Chocolate Blossom Cookies are a delightful treat that brings back memories of my childhood, where every bite felt like a warm hug. These cookies are not just delicious; they’re a quick solution for a busy day or a sweet way to impress your loved ones. With a soft, chewy texture topped with a melted chocolate kiss, they’re perfect for any occasion. Whether it’s a family gathering or a cozy night in, these cookies will surely bring smiles all around.
Why You’ll Love This Chocolate Blossom Cookies
These Chocolate Blossom Cookies are a dream come true for any home cook. They’re incredibly easy to whip up, making them perfect for those busy weeknights or last-minute gatherings. The rich chocolate flavor combined with the gooey kiss on top creates a taste sensation that’s hard to resist. Plus, they bake in just 12 minutes! You’ll love how quickly they disappear from the cookie jar, leaving everyone asking for more.
Ingredients for Chocolate Blossom Cookies
Gathering the right ingredients is the first step to creating these delightful Chocolate Blossom Cookies. Here’s what you’ll need:
- Unsalted butter: This is the base of your cookies, providing richness and flavor. Make sure it’s softened for easy mixing.
- Granulated sugar: Adds sweetness and helps create that perfect chewy texture.
- Brown sugar: The molasses in brown sugar gives these cookies a deeper flavor and moisture.
- Large eggs: They bind the ingredients together and add to the cookie’s structure.
- Vanilla extract: A splash of vanilla enhances the overall flavor, making each bite more aromatic.
- All-purpose flour: This is the main dry ingredient that gives the cookies their shape and texture.
- Baking soda: A leavening agent that helps the cookies rise and become fluffy.
- Salt: Just a pinch balances the sweetness and enhances the flavors.
- Semi-sweet chocolate chips: These add extra chocolatey goodness throughout the cookies.
- Chocolate kisses: The star of the show! These are pressed into the warm cookies for a melty, sweet finish.
For those looking to mix things up, consider adding nuts or using dark chocolate chips for a richer flavor. You can find all the exact measurements at the bottom of the article, ready for printing!
How to Make Chocolate Blossom Cookies
Now that you have all your ingredients ready, let’s dive into the fun part: making these Chocolate Blossom Cookies! Follow these simple steps, and you’ll have a batch of delicious cookies in no time.
Step 1: Preheat the Oven
First things first, preheat your oven to 350°F. This ensures that your cookies bake evenly. While the oven warms up, prepare your baking sheets by lining them with parchment paper. This little trick prevents sticking and makes cleanup a breeze.
Step 2: Cream the Butter and Sugars
In a large mixing bowl, cream together the softened butter, granulated sugar, and brown sugar. Use an electric mixer for about 2 to 3 minutes until the mixture is light and fluffy. This step is crucial; it incorporates air into the dough, giving your cookies that perfect texture.
Step 3: Add Eggs and Vanilla
Next, add the eggs one at a time, mixing well after each addition. This helps to create a smooth batter. Then, stir in the vanilla extract. The aroma of vanilla will fill your kitchen, making it feel even more inviting!
Step 4: Combine Dry Ingredients
In a separate bowl, whisk together the all-purpose flour, baking soda, and salt. This step ensures that the baking soda is evenly distributed, which is key for a consistent rise in your cookies.
Step 5: Mix Wet and Dry Ingredients
Gradually add the dry ingredients to the wet mixture. Mix just until combined; overmixing can lead to tough cookies. You want a soft dough that’s ready for the next step!
Step 6: Fold in Chocolate Chips
Now, gently fold in the semi-sweet chocolate chips. This is where the magic happens! The chocolate chips will melt slightly during baking, creating pockets of gooey goodness in every bite.
Step 7: Shape the Cookies
Using a cookie scoop or your hands, drop rounded balls of dough onto the prepared baking sheets. Make sure to space them about 2 inches apart. They’ll spread while baking, so give them some room to breathe!
Step 8: Bake the Cookies
Pop the baking sheets into the oven and bake for 10 to 12 minutes. Keep an eye on them; you want the edges to be lightly golden while the centers remain soft. This is the sweet spot for that perfect chewy texture.
Step 9: Add Chocolate Kisses
As soon as the cookies come out of the oven, press a chocolate kiss into the center of each cookie while they are still warm. The heat will melt the kiss slightly, creating a delicious topping that’s hard to resist.
Step 10: Cool the Cookies
Let the cookies cool on the baking sheets for about 5 minutes. This allows them to set before transferring them to a wire rack to cool completely. The anticipation will be worth it when you finally take that first bite!
Tips for Success
- Make sure your butter is softened for easy mixing; it should be at room temperature.
- Don’t overmix the dough; mix just until combined for soft, chewy cookies.
- Use a cookie scoop for uniform cookie sizes, ensuring even baking.
- Experiment with different chocolate types, like dark or milk chocolate, for variety.
- Store cookies in an airtight container to keep them fresh and chewy.
Equipment Needed
- Mixing bowls: A large bowl for mixing and a smaller one for dry ingredients. Any size will do!
- Electric mixer: A hand mixer works great, but a whisk can do the job if you’re feeling strong.
- Baking sheets: Use any flat baking tray; just line it with parchment paper.
- Cookie scoop: A tablespoon works well if you don’t have a scoop.
- Wire rack: A cooling rack is ideal, but a plate can work in a pinch.
Variations
- Nutty Delight: Add chopped walnuts or pecans for a crunchy texture that complements the chocolate.
- Peanut Butter Twist: Substitute half of the butter with creamy peanut butter for a rich, nutty flavor.
- Minty Fresh: Incorporate mint chocolate chips instead of semi-sweet for a refreshing twist.
- Gluten-Free Option: Use a gluten-free all-purpose flour blend to make these cookies suitable for gluten-sensitive friends.
- Vegan Version: Replace butter with coconut oil and use flax eggs for a plant-based treat.
Serving Suggestions
- Milk: Pair these cookies with a cold glass of milk for a classic combination that never disappoints.
- Coffee: Enjoy them alongside a warm cup of coffee or espresso for a delightful afternoon treat.
- Presentation: Arrange cookies on a decorative plate and sprinkle with powdered sugar for an elegant touch.
- Ice Cream: Serve with a scoop of vanilla ice cream for an indulgent dessert experience.
FAQs about Chocolate Blossom Cookies
As you embark on your journey to bake these delightful Chocolate Blossom Cookies, you might have a few questions. Here are some common queries that can help you along the way:
Can I use different types of chocolate for these cookies?
Absolutely! While semi-sweet chocolate chips are traditional, feel free to experiment with dark chocolate or even white chocolate chips. Each type will give your cookies a unique flavor twist!
How should I store my Chocolate Blossom Cookies?
To keep your cookies fresh and chewy, store them in an airtight container at room temperature. They can last up to a week, but I doubt they’ll last that long!
Can I freeze the cookie dough?
Yes, you can! Just scoop the dough into balls and freeze them on a baking sheet. Once frozen, transfer them to a zip-top bag. When you’re ready to bake, just add a couple of extra minutes to the baking time.
What can I do if my cookies spread too much while baking?
If your cookies spread too much, it could be due to warm butter or not enough flour. Make sure your butter is softened but not melted, and consider adding a bit more flour to the dough next time.
Are Chocolate Blossom Cookies suitable for special diets?
Yes! You can easily adapt this recipe for various dietary needs. Use gluten-free flour for a gluten-free version or substitute butter with coconut oil for a dairy-free option. Enjoy baking!
Final Thoughts
Baking Chocolate Blossom Cookies is more than just a recipe; it’s an experience filled with joy and nostalgia. The simple act of mixing ingredients transforms into a delightful journey, bringing warmth to your kitchen and smiles to your loved ones. Each cookie, with its soft texture and sweet chocolate kiss, is a reminder of the little moments that matter most. Whether you’re sharing them at a gathering or enjoying them solo with a cup of coffee, these cookies are sure to create lasting memories. So, roll up your sleeves and let the magic of baking unfold!