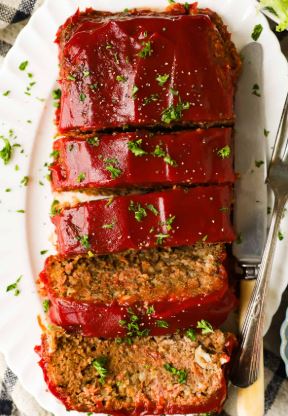
Introduction to Classic Meatloaf
There’s something undeniably comforting about a slice of classic meatloaf.
Growing up, it was a staple at our family dinners, a dish that brought everyone together after a long day.
This classic meatloaf recipe is not just about nostalgia; it’s a quick solution for busy weeknights or a way to impress your loved ones with minimal effort.
With its juicy texture and rich flavors, it’s the kind of meal that warms the heart and fills the belly.
Let’s dive into the secrets of creating this timeless comfort food that never goes out of style!
Why You’ll Love This Classic Meatloaf
This classic meatloaf is a game-changer for your dinner routine.
It’s incredibly easy to whip up, taking just 15 minutes of prep time.
The blend of flavors creates a mouthwatering dish that pleases even the pickiest eaters.
Plus, it’s a one-pan wonder, making cleanup a breeze.
Whether you’re feeding a family or hosting friends, this meatloaf guarantees smiles all around.
Trust me, it’s comfort food at its finest!
Ingredients for Classic Meatloaf
Creating the perfect classic meatloaf starts with the right ingredients.
Here’s what you’ll need to bring this dish to life:
- Ground Beef: An 80/20 blend is ideal for juicy flavor. The fat content keeps the meatloaf moist.
- Breadcrumbs: These act as a binder. Plain or Italian breadcrumbs add texture and flavor.
- Milk: A splash of milk adds moisture, ensuring your meatloaf doesn’t dry out.
- Ketchup: This sweet and tangy sauce is a must for flavor and a glossy finish. Save some for the topping!
- Onion: Finely chopped onion brings a savory depth. It caramelizes beautifully during baking.
- Bell Pepper (optional): Adds a pop of color and sweetness. Feel free to skip it if you’re not a fan.
- Eggs: These bind the mixture together, giving the meatloaf its structure.
- Worcestershire Sauce: A splash of this sauce enhances the umami flavor, making every bite irresistible.
- Garlic Powder: For a hint of garlic without the chopping. It adds a warm, aromatic touch.
- Onion Powder: A double dose of onion flavor! It complements the fresh onion perfectly.
- Salt and Black Pepper: Essential seasonings that elevate the overall taste.
- Dried Thyme and Oregano (optional): These herbs add a lovely earthiness. Customize to your taste!
For exact measurements, check the bottom of the article where you can find everything listed for easy printing.
With these ingredients, you’re well on your way to crafting a classic meatloaf that’s sure to impress!
How to Make Classic Meatloaf
Making a classic meatloaf is a straightforward process that yields delicious results.
Follow these simple steps to create a juicy masterpiece that will have everyone coming back for seconds.
Step 1: Preheat the Oven
Start by preheating your oven to 350°F (175°C).
This step is crucial because it ensures even cooking throughout the meatloaf.
While the oven heats up, grease a loaf pan or line it with parchment paper for easy removal later.
Trust me, you’ll thank yourself when it’s time to serve!
Step 2: Combine Ingredients
In a large mixing bowl, combine the ground beef, breadcrumbs, milk, ketchup, chopped onion, and bell pepper if you’re using it.
Mixing these ingredients is where the magic begins.
Use your hands to gently combine everything, but be careful not to overwork the mixture.
Overmixing can lead to a dense meatloaf, and nobody wants that!
Step 3: Shape the Meatloaf
Once your ingredients are well combined, it’s time to shape the meatloaf.
Transfer the mixture into the prepared loaf pan, pressing it down gently to form a loaf.
Make sure it’s even on all sides for consistent cooking.
A well-shaped meatloaf will cook evenly and look great on the plate!
Step 4: Add Topping
Now, let’s talk about the topping.
Spread a layer of ketchup on top of the meatloaf before baking.
This not only adds flavor but also helps keep the meatloaf moist during cooking.
Plus, it gives a beautiful glaze that makes it look irresistible!
Step 5: Bake to Perfection
Place the loaf pan in the preheated oven and bake for about 1 hour.
To check for doneness, use a meat thermometer.
You’re looking for an internal temperature of 160°F (70°C).
If the top starts to brown too much, cover it loosely with foil to prevent burning.
Step 6: Rest and Serve
Once your classic meatloaf is done baking, let it rest for about 10 minutes before slicing.
This resting period is essential as it allows the juices to redistribute, keeping your meatloaf juicy and flavorful.
Slice it up, serve with your favorite sides, and enjoy the fruits of your labor!
Tips for Success
- Use an 80/20 ground beef blend for the best flavor and moisture.
- Don’t overmix the meatloaf; gentle hands keep it tender.
- Let the meatloaf rest before slicing to retain juiciness.
- Experiment with seasonings to make it your own.
- For a twist, try adding grated cheese or chopped herbs.
Equipment Needed
- Loaf Pan: A standard loaf pan works best, but you can use a baking dish if needed.
- Mixing Bowl: Any large bowl will do; just make sure it’s big enough for mixing.
- Meat Thermometer: Essential for checking doneness; a regular thermometer can work in a pinch.
- Spatula or Spoon: For mixing ingredients; a sturdy spatula is my go-to.
Variations
- Turkey Meatloaf: Swap ground beef for ground turkey for a leaner option. Add extra spices to enhance flavor.
- Vegetarian Meatloaf: Use lentils or black beans as a base, combined with oats and veggies for a hearty, meat-free version.
- BBQ Meatloaf: Mix in your favorite BBQ sauce instead of ketchup for a smoky twist. Top with more BBQ sauce before baking.
- Cheesy Meatloaf: Incorporate shredded cheese into the mixture for a gooey surprise. Cheddar or mozzarella works great!
- Spicy Meatloaf: Add diced jalapeños or a dash of hot sauce to the mix for a kick that’ll wake up your taste buds.
Serving Suggestions
- Classic Mashed Potatoes: Creamy mashed potatoes are a perfect side, soaking up the meatloaf juices.
- Green Beans: Steamed or sautéed green beans add a fresh crunch and vibrant color.
- Side Salad: A simple garden salad with a tangy vinaigrette balances the richness of the meatloaf.
- Red Wine: Pair with a glass of red wine for a comforting dinner experience.
- Presentation: Serve on a rustic wooden board for a homey touch that invites everyone to dig in!
FAQs about Classic Meatloaf
Can I use ground turkey instead of beef for classic meatloaf?
Absolutely! Ground turkey is a great alternative for a leaner classic meatloaf. Just be sure to add extra seasonings to enhance the flavor, as turkey can be milder than beef.
How do I know when my meatloaf is done?
The best way to check for doneness is by using a meat thermometer. You want the internal temperature to reach 160°F (70°C). This ensures your classic meatloaf is cooked through and safe to eat.
Can I make classic meatloaf ahead of time?
Yes! You can prepare the meatloaf mixture a day in advance and store it in the fridge. Just shape it and bake it when you’re ready to enjoy a delicious meal.
What can I do with leftover meatloaf?
Leftover classic meatloaf makes for fantastic sandwiches! Just slice it up and add it to your favorite bread with some mayo or mustard. You can also crumble it into pasta sauce for a hearty twist.
Is classic meatloaf gluten-free?
To make a gluten-free classic meatloaf, simply substitute regular breadcrumbs with gluten-free breadcrumbs. This way, you can enjoy this comforting dish without any worries!
Final Thoughts
Creating a classic meatloaf is more than just following a recipe; it’s about crafting a meal that brings warmth and joy to your table.
The aroma wafting through your kitchen as it bakes is enough to make anyone’s mouth water.
Each slice reveals a tender, juicy interior that’s bursting with flavor, making it a dish everyone will love.
Whether it’s a weeknight dinner or a special occasion, this classic meatloaf is sure to become a cherished favorite.
So roll up your sleeves, gather your ingredients, and enjoy the satisfaction of serving up this timeless comfort food!
Get access to this and other recipe cards - free!
✓ Free membership — no credit card required